Tuesday, January 20, 2015

Skinny Texas Sheet Cake Recipe

Skinny Texas Sheet Cake Recipe

http://therecipecritic.com/2015/01/skinny-texas-sheet-cake/ 
Here is another great recipe for Skinny Texas Sheet Cake that I found on Pinterest: /http://therecipecritic.com/2015/01/skinny-texas-sheet-cake/

Skinny Texas Sheet Cake

Author: Alyssa
Prep time:  15 mins
Cook time:  15 mins
Total time:  30 mins
Serves: 40

A delicious and moist texas sheet cake that is made with healthier ingredients and absolutely incredible!

Ingredients

    Cake ingredients:
    1 cup water
    ½ cup butter
    ⅓ cup unsweetened cocoa powder
    2 eggs
    ¾ cup Greek yogurt
    ½ cup unsweetened applesauce
    1 cup whole wheat flour
    1 cup all purpose white flour
    1-1/2 cups sugar
    1 teaspoon baking soda
    ½ teaspoon salt
    Chocolate Frosting:
    ½ cup butter
    ⅓ cup unsweetened cocoa powder
    6 tablespoons milk
    1 teaspoon vanilla extract
    4 cups powdered sugar

Instructions

    Preheat oven to 350 degrees. Add the butter, water, and cocoa to a medium microwave safe bowl. 

Cook for about 2-2½ minutes whisking 30 seconds at a time until melted and smooth. Set aside.

    In a medium sized bowl combine eggs, yogurt and applesauce and whisk until smooth. Set aside.

    In a large mixing bowl, combine flour, sugar, baking soda, and salt. Whisk together. Add the warm chocolate mixture and stir to combine. Lastly add the yogurt mixture and stir again until combined. The batter may have a few lumps, but that is ok.

    Pour into an ungreased jelly roll pan (13x18) or two 9x13 baking sheets and bake for 15-20 minutes until toothpick inserted in the center comes out clean.

    To make the frosting: Melt the butter in a microwave safe bowl. Add cocoa and whisk until smooth. Whisk in milk and vanilla and lastly whisk in the powdered sugar. Pour over the cake and frost to the edges. Let the cake cool completely and allow the frosting to set.

Skinny Texas Sheet Cake Recipe Ingredients


Great Advice To Get You Cooking In The Kitchen

Real Advice To Get You Cooking In The Kitchen


There are many sources of information on cooking. Some information is geared towards experienced chefs and not for the average person.

It can be confusing to wade through all of the available information. Fortunately, this article will give you some great tips. They will work for anyone, even a novice.

When you are making stock, make a lot of it. Then save it in a plastic zip bag, date it and freeze it. That way you can pull it when you would like to make a soup. You can use it to boil some veggies in. Having some in the freezer will make preparing healthy meals very much easier.

If you are cooking pasta and are tired of the same taste, you can add a hint of lemon. Lemon will give it the extra taste that you desire, and this additive is also a very powerful antioxidant. Adding spices and different flavors can help improve the quality of your meals.

There are few things more frustrating in grilling than going to flip a burger and finding that it has stuck to the grill. Try brushing the grill using vegetable oil prior to cooking so you can avoid sticking.


Learn More About the Cuisinart CBK200 Breadmaker! 

When making homemade salad dressings it is a good idea to use extra-virgin olive oil. It has a fruity flavor that really adds to a salad. Extra-virgin olive oil can be somewhat expensive so it is important to buy it when it is on sale or with a coupon to make it more affordable.

When working with poultry, use this useful tip to let your poultry shine. Soak the poultry in a brine solution composed of salt and water overnight before cooking the poultry. Soaking the poultry in brine will help to unlock the flavors buried in the meat and make the poultry succulent and moist, creating an incredible poultry dish.

Some recipes call for peeled half or quarter peaches. In most cases peeling is not easy, as the skin sticks to the fruit and doesn't come off. The easiest way to remedy the problem is to place the peaches in boiling water for 30 seconds. After removing the fruits, place them into ice water to stop the boiling effect. Their skin will come off easily.

If you are making a dish where you will need thin strips of meat (fajitas, Chinese) freeze your meet for about 20 minutes before cutting. This will allow you to slice the meat very thinly with ease. You may think this sounds a little strange, but it will definitely do the trick.

Don't use prepared seasoning mixes when you cook, especially if you have high blood pressure. These mixes often have a high sodium content. Instead, use fresh herbs and spices, or make sure you choose a low-salt mix. For more flavor, try adding lemon or lime zest or a few chili peppers to your meal.

In the real world, cooking involves practical real world ideas. You will have the best experience when you have simple information that you can easily translate into your kitchen. Complexity will slow you down. When you put into practice the tips that you have learned here, you will notice that your meals will become much tastier.

Friday, January 16, 2015

Best Rated Electric Food and Vegetable Steamers

Electric Food and Vegetable Steamers


Electric food and vegetable steamers are great for a healthy diet. I like to steam fresh vegetables like squash, spinach, carrots, and broccoli. There is no need to add oil or added fats and it's a wonderful way to stay on track with your diet.

Here are some of the best rated electric food and vegetable steamers for your kitchen!


Best Rated Bread Makers for 2015

I love to bake homemade bread in my automatic breadmaker. It's nice to get a box of bread mix and make cinnamon raisin bread for the morning.

Here are some of my favorites for the best rated bread makers of 2015.


Friday, January 9, 2015

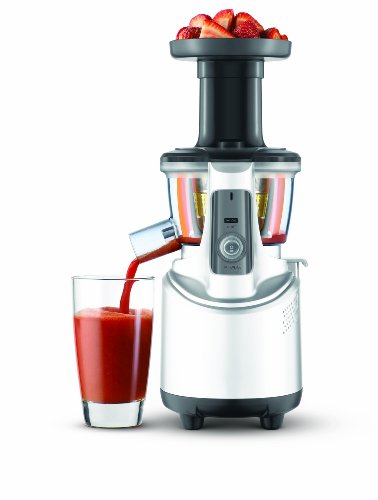
Getting and Using the Breville BJS600XL Fountain Crush Masticating Slow Juicer

Breville BJS600XL Fountain Crush Masticating Slow Juicer - What's So Great About This Juicer? 


Nutrients in the juice, fiber in the pulp

Centrifugal juicers get the job done quickly, but what if you want your juice smooth with some pulp?

That’s where masticating juicers come in. Also known as slow juicers or single auger juicers, they crush and squeeze rather than shredding.

That means that it maximizes the amount of nutrients extracted and more of the fiber stays in, making for a delicious glass of thick, smooth juice.

Why choose a slow juicer?

There are two main types of juicer: centrifugal juicers and slow (or masticating) juicers.
Centrifugal juicers work by shredding the fruits and vegetables and then spinning at a high speed to separate the pulp and juice. Slow or masticating juicers crush and grind the fruits and vegetables to extract the juice, then filter out the pulp.

They’re called slow juicers because they don’t spin rapidly, not because it takes a long time to make juice; it only takes minutes to produce juice! Slow juicers produce drier pulp than centrifugal juicers, and extract more juice from leafy greens like kale. Some people have a preference from juice from a slow juicer, since it tends to be less frothy and more thick.


Click Here to Learn More About the Breville BJS600XL Slow Juicer

Versatility for maximum yield and results

Masticating juicers are best at juicing softer fruits like berries and wheatgrass and excel at juicing leafy greens, but can also juice harder fruits and vegetables like apples and carrots.

Because the Juice Fountain Crush juices slowly, it keeps more of the fiber and less of the froth in the juice and produces very dry pulp.

Juicing made simple

The Juice Fountain Crush makes juicing and cleanup easy. With features like a safe start system that requires all parts to be locked in before the juicer starts, reverse direction control, and an overload protection system that automatically stops the machine from operating when the load is too high, the Juice Fountain Crush makes operation safe and easy.

To cleanup and flush out the system between making different kinds of juice without having to disassemble the entire machine, simply pour in 1-2 cups of water while the motor is running to flush the previous ingredients through.

It comes with a cleaning brush to remove the pulp from the mesh basket, and the handle of the brush is the perfect size to clear out the pulp chute of the juicer.

And, even though it’s powerful, the Juice Fountain Crush’s 240 watt motor runs quietly so your morning glass of juice won’t wake the rest of the household.

Monday, November 24, 2014

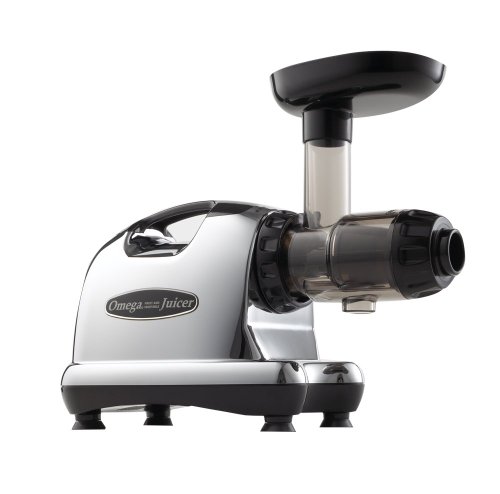
The Omega J8006 Nutrition Center Juicer - For Juicing Goodness

The Omega J8006 Juice Extractor For the Serious Juicer


 By Phil Prince

 The Omega J8006 Juice Extractor is a juicer that has done wonders to my health and goals for new wellness.

Click Here to Learn More About The Omega J8006 Nutrition Center Juicer!

This isn't the run of the mill juicer you see on late night TV ads or the juicer your grandparents had when making fresh orange juice.

The Omega J8006 Juice Extractor will change the way you thought juicing was possible and here are some reasons why.


First off the Omega J8006 Extractor extracts juice differently than other juicers on the market today. Instead of spinning it at high speeds - producing heat, it slowly extracts the juice and pulls the juice out of fruits and vegetables.

This slow and cool pull makes the juice foam free unlike other juicers out there and makes a surprising amount of juice from just a couple pieces of fruits and/or vegetables.

 Most kitchen appliances are big eyesores in your kitchen, but the Omega J8006 Juice Extractor is really stylish and modern looking. With a weight of about 17 pounds it's sturdy and built to last. No need to worry about it slipping off your counter. It looks like a serious appliance which it very much lives up to. It sits very nicely on top of your kitchen counter and with its stylish almost futuristic look it will enhance just about any kitchen.

One small problem I have with the omega J8006 Juice Extractor is the size of the feeder. Some juicers out there you can just put the whole piece of fruit or vegetable right into the feeder. With the Omega you have to cut up the fruit and vegetables a bit because the feeding tube is smaller. But as I'm sure you are aware of cutting up vegetables is a very easy task to do and won't be a bummer to most including myself. The price tag for the Omega J8006 Juice Extractor is definitely not cheap, and it was not meant for someone that just wants a fresh glass of orange or carrot juice in the morning.

This Juicer is for the person who want to make serious juices - ones that will fuel your cells with energy and provide you with all the wonders that natural fruits and vegetables provide. Drinking a glass of fresh juice from an Omega J8006 can energize your mornings and brighten your day. I highly recommend the Omega J8006 Juice Extractor - it has been an one of the greatest additions to my home kitchen and has helped me get on a great path to health and wellness.

 Phil Prince is a writer and researcher on products for households such as the omega J8006 Juice Extractor. You can save time and money by getting a FREE in depth review of this juicer and many others along including discounts and best prices at Phil's blog: vegetableandfruitjuicer.com

Article Source: http://EzineArticles.com/?expert=Phil_Prince

Tuesday, November 18, 2014

Best Rated Coffee Grinders for the Kitchen

The Coffee Grinder: Handy Tool For Coffee Lovers 

By  
Recommend Article

Grinding coffee in your own kitchen provides the opportunity to touch and smell the beans, as well as anticipate the sweetness, acidity, taste and flavor of the cup. The coffee you prepare is rich and fresh and the aroma filling the room is a great way to start a new day.

There are tools and appliances that are prized possessions on the kitchen counter full-time. Yours may be different from the ones someone else prefers but they probably include several of the following: a coffee maker with a built-in grinder or a standalone coffee grinder, a blender, juicer or food processor, a set of quality knives, and a radio.

The choices of grinders available are many. Antique grinders in cylinder shaped mills. Manual grinders you place above a bowl to catch the ground coffee. Hand-cranked grinders with a drawer below the blade for the grounds. The mortar-and-pestle coffee grinder is another antique version that requires manual strength and patience to grind the coffee. Other types of available coffee grinders include electric and manually operated models with conical or wheel burr grinding.

The history of coffee grinders takes us back to the Middle Ages to Turkey, Persia and Greece. Coffee beans were roasted in small saucers over a fire. A cylinder shaped mill was used to grind the coffee. The manually hand cranked grinder was fairly simple in its design. The top would have a removable lid to put the coffee beans in the main body of the container. The main body was shaped like a cylinder. The mill inside would grind the coffee beans. The ground coffee would fall into a bowl or plate. The grounds were transferred to a different container for brewing. Grinders were modified over time. For example, two conical sockets were added to the design. One attached to the mill and the other to the bottom of the body using a screw. The bottom container would hold the ground coffee. This is the way the Turkish manual coffee grinder is still used by millions of people in Turkey and abroad.

A wooden mortar-and-pestle grinder, used to make "coffee powder," was listed in the cargo of the Mayflower in 1620. This is not a surprise since Captain John Smith (c. January 1580-June 21, 1631), who was an English soldier, explorer, author and among the first arrivals in the New Continent, had become familiar with coffee during his visits to Turkey. It is interesting to note that the Dutch, who had early knowledge of coffee from their colonies around the world, were not the first to bring coffee to the first permanent settlements. However, coffee was probably imported from Holland as early as in 1640. The British introduced the coffee drink to the New York colony sometime between 1664 and 1673 which is noteworthy since tea is the traditional British beverage. In the 1670's coffee was roasted, ground, brewed, and then flavored with sugar or honey, and cinnamon. Undoubtedly the mortar-and-pestle coffee grinding technique changed as innovative New World settlers figured out ways to ease the task of coffee grinding through the use of more efficient and long lasting coffee grinding tools.

The first US patent for a coffee grinder was issued to Thomas Bruff of Maryland in 1798. Thomas Bruff was one of Thomas Jefferson's dentists. Thomas Jefferson often referred to tooth problems and dental visits in letters that are now public record. It is quite possible that when he visited Dr Bruff's office, Thomas Jefferson may have seen a wall-mounted device with ground beans between metal nuts with coarse and fine teeth. No pun intended but how appropriate for a dentist to have filed the first US patent for a coffee grinder! In 1870 the Champion# 1 became one of the most widely used commercial grinders in grocery stores. In 1898, the Hobart Manufacturing Company of Troy, Ohio, filed a patent for an electric grinder. The design included teeth on a rotating shaft inside the housing underneath the bean compartment. Several years later several patents were granted for grinder blades using slightly different improvements in the steel-cut design.

For some coffee lovers and connoisseurs, antique coffee grinders are a must collectible in their homes. This does not mean that if you are one of them you have to hunt for one at garage sales or at old-fashioned general stores. You certainly can do so if that is your preference. However, well-known coffee making equipment manufacturers recognized the trend and now offer a wide selection of coffee machines that look genuinely antique. They preserve the look and feel of antique coffee grinders but incorporate modern improvements to ensure a fine and superior grind for great tasting coffee. Some of the brands for antique style gourmet coffee grinders include Bodum, Universal, and Jablum to mention just a few.

Of course, you do not have to use an antique coffee grinder to grind your beans. There are many alternatives available in modern coffee grinding equipment to satisfy the most demanding of coffee lovers. Burr grinders are probably the best choice for home coffee grinding. They tend to have two different spinning surfaces to crush the beans placed between them. The styles, sizes, shapes of cylinders, and other features vary from one model to the next. Why use a burr grinder? Unlike blade grinders, burr grinders crush coffee in an almost frictionless way which means the beans release the maximum flavor oils for a fresh and great cup of brewed coffee. Burr grinders are available as either manually operated or automatic grinders. The choice will be entirely up to you. The manual process is not that long, really. It usually takes about 5 minutes of manual grinding or so for a typical 8 to 12 cup pot size. However, this can be inconvenient if you are pressed for time. Whether you choose a manual or automatic burr grinder, the coffee will be uniformly ground which is a great feature for great tasting coffee. Bodum, Capresso, and Breville are examples of brands of burr coffee grinders available.

With all this talk of coffee, I'm ready for a great cup of Jamaican Genuine Blue Mountain gourmet coffee. Want to join me for a cup?

Timothy ("Tim") S. Collins, the author, is called by those who know him "The Gourmet Coffee Guy."
He is an expert in article writing who has done extensive research online and offline in his area of expertise, coffee marketing, as well as in other areas of personal and professional interest.

Come visit the author's website: http://www.ourgourmetcoffee.com
Also visit: http://www.squidoo.com/thegourmetcoffeeguy-lensography

© Copyright - Timothy S. Collins. All Rights Reserved Worldwide
Article Source: http://EzineArticles.com/?expert=Timothy_S._Collins
 

How to Use A Coffee Grinder to Get The Most Out Of Your Coffee